Monday, November 26, 2012

Top 10 from Team BC

Since the holidays are almost here, we're giving you a gift! Each of our stores has put together a list of their top 10 favorite things at Creative Packaging. We'll be sharing them all month long on our Facebook and Twitter pages! Follow along and discover some hidden gems and well-known items we have to offer!

We begin with Team BC's top 10 favorites:

1. Mini-Stockings – Yes, they are back – and we have fallen in love with these all over again. This year’s stocking features a snowflakes embroidery. Jocelyn from Team BC uses them for gift card giving.


2. Jewel Ribbon – This is a brand-new product this season. Barb has a particularly soft spot for this. Who wouldn't? It is so versatile! Doesn't it look great on the black handle box? What a chic look for a cookie exchange.


3. Christmas Clips – We have embraced cute this year. Six styles including Santa, Frosty and Rudolf!
Bernadette has three young children – she can’t wait for the holiday parties at school. These aren’t just
for kids – card makers are snapping these up too!


4. 1/2 Satin Ribbon – Bigger is better isn’t it? Pictures don’t lie, and this one says wow! The possibilities are endless. This thick ribbon is all over the magazines – and we know exactly why. This red pops into life right off this apple green gable box. Home decorators – this is a new necessity in your tool kit this year.
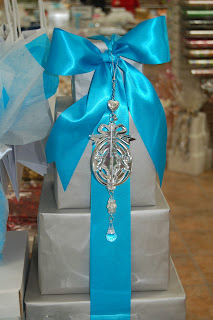


5. Silver and blue – Christmas should be beautiful, don’t you think? This soothing combination will take the stress out of the holiday season. It doesn't have to be red and green to be festive. The silver ornament will sure be a great addition to your festive look this year.


6. Peppermint Party Bags – Yes, yes and yes! The traditional peppermint is here for this whimsical season. The smaller 6x6 gift bag is perfect for all those precious gifts. Did you notice the wrap film used as tissue in the bag? We think this is a great texture for a fresh look.


7. Lime green damask bags – Home decor is all over the packaging world! Here is a great contemporary look for your cookies and baking. Here we have placed a 3x3x3 white box inside. Now you have a new idea for the stockings! These bags are also available in black. 


8. Cupcake ornaments – Holidays are always delicious, and these cupcakes won’t go to your hips! Fancy this on top of all your festive gifts, or by itself makes a delightful gift. These are shown on our cupcake stand – a perfect display piece for after dinner desserts.


9. Metallic Non-woven Bags – These are great for all of the larger, heavier gifts on your list. In fact, the bag is a gift in itself because it can be used again and again. This is just one of many sustainable packaging products available in store. We couldn't resist showing it in blue and silver. Purple and royal blue are available too. Come and see the smaller size in the store.


10. Zebra Tissue – It can’t be about the holidays all the time! Check out this zebra tissue – it is a part of our animal print collection. We are nearing the coldest time of year – but this, along with gift wrap featuring elephants, and leopard gift bags will put your right in the heart of an African savanna. (Other product mentioned not shown – see it on creativepackaging.ca!) 


Monday, November 19, 2012

DIY: Candy Bouquet

Today we're showing you how to build a candy bouquet! You can find the tissue paper, wrap and ribbons you need to make this at Creative Packaging, so come on in today!

1. To build the container, you'll need the following materials: Spare cardboard, hot glue gun, a sharp knife, scissors, packing tape and a ruler. For the cardboard, use a piece that is high enough to support the candy canes without being seen in the finished product.


2. Trace anything you can find to make a piece in the shape of a circle that will be needed to make the base. Keep in mind that this piece will determine the size of the cylinder. If using thinner cardboard make two circles and glue them together.


3. On the rectangle piece of cardboard use the knife and ruler to cut part way through the cardboard. Make a cut from the top to the bottom about every ¼ inch. Make cuts until the entire piece is scored. Try making a cylinder shape to see if any cuts should be made or fixed.


4. Using the hot glue, attach the base to one edge of the rectangle on the side that was not cut. Slowly add glue and roll the circle over. Go slowly so that the glue has time to set. At the end, use glue to attach both sides of the rectangle to one another. If there is a lot of cardboard left over simply cut it off in order to minimize the bump caused by overlapping.


5. This step involves using the glue and tape to create your own double sided tape. Cut off a long piece of tape and stick it close by on the edge of a table so that it hangs down.


Make a wave of hot glue around the bottom of the container. Take the lose end of the tape and stick it to the glue. Stick the non-stick side of the tape to the glue so the sticky side faces out.


Spin the container so that the tape becomes glued to it. Repeat this step two more times (at the bottom, the middle and the top of your container)


 6. After that, you are ready to start sticking on candy canes. For this part the strings were left on which was a pain to help pull them away from the candy canes while sticking them on to prevent them from sticking to your tape. It does not matter where this process is started. Make them as straight as possible and stick them side by side. Add tissue inside, it helps to keep the strings from the canes down and for placing the candy flowers.


Wrap a ribbon around the middle of the candy canes. The final product of the base should look like this:


To create the candy flowers cut at least 12 inches of wrap off the roll.

1. Fold this piece in half and cut it. Then fold it in half and cut it again. There should be four square-ish pieces of wrap.

2. Using two pieces, set them one on top of the other with staggered edges. Cut a hole in the middle.

3. Place a candy (with the entire string piece removed, plastic and all) into the whole and bring the wrap up around the candy.

4. Use ribbon to tie the wrap around the candy. A good place for this is the > < shape between the candy body and the ‘wrapper’ end.

5. Using a skewer, place the candy on the blunt end and poke the pointed end into the bundled up tissue paper. For this part, have fun and make beautiful flowers. For ours we used the cavanagh red and the green damask. Then filled in the bottom with forest green tissue paper to help push up the flowers and hide the sticks they were held on.

Here's your finished candy bouquet!


Wednesday, November 14, 2012

DIY: Ribbon organizer

Did you know our flower boxes make a great dispenser and/or storage container for ribbon?

Come on into your nearest Creative Packaging store to get yours today!

Need more ideas? Check us out on Facebook and Twitter, or visit us on our website

(Or share your ideas by sending us an email!)

Monday, November 12, 2012

DIY: Creative's angel for the holidays!

This is a great DIY project that's fun and easy to do:

Step-by-step instructions using all in store products!


(Products used: 4 sheets tissue, 2 colors raffia, tulle, burlap, faux jewel ribbon)

1. Simply crumple 2 sheets of tissue into a ball for Angel’s head.
2. Using other 2 sheets of tissue, slightly stagger 1 on top of the other, with the prominent color on bottom. Place ball in center & lift from bottom of sheets & wrap around ball. Secure with elastic.
3. Using a black felt, draw Angel’s face.
4. Tie 2 strands of raffia around elastic/neck.
5. Using tulle, make 1 smaller bow & 1 larger bow. Place the smaller one in front of the larger one & secure together with stick pin. Set aside.
6. Cut a 9½” x ½” piece of burlap. Make sure to use the wired edge.
7. Cut the same size piece of faux jewel ribbon & tape or glue onto the burlap.
8. Twist to form a halo.
9. Use another small strip of burlap (wired edge) & attach to halo & slip under elastic/raffia at back of neck.10. Finally, attach the bows to the back of neck for Angel’s wings.

Wednesday, November 7, 2012

Did you know? (Holiday Edition)

Did you know that you can make 200 bows from one roll of wrap film from Creative Packaging? It's true! And it's easy! Simply cut strips 40 inches long by 6 inches wide, and tie each in a bow like this one.

Hang them on your front door, your holiday tree or around the house! Or use them for holiday party decor!

Need more ideas? Check us out on Facebook and Twitter, or visit us on our website.

(Or share your ideas by sending us an email!